Heidi Proffetty's Top 5 Digital Cutter Tips for Quilt Making, Happenings In and Out of the Studio
- Heidi Proffetty

- Jan 15, 2023
- 9 min read

If you've read any of my older posts on using a digital cutter in quilt making, attended one of my classes or lectures, or if you've seen one of my mosaic quilts in person, than you know that I use a few innovative tools in my process, namely, a digital cutter. Basically, the mosaic shapes are applique fabric pieces with a fusible webbing applied to the fabric's backside, then the fabric shapes are precisely cut using a electronic digital cutting machine. For years, besides my sewing machines, two of my most prized tools to work with are my cutting machines and the digital software that I use to create my designs with. Today's post is not focused on the software's that I use to draw my mosaic designs with (I'll save that for future post) but instead, I am going to share with you my Top 5 Digital Cutter Tips for quilt making.
#1 - Stabilize Your Quilting Fabric

The more rigid you make your quilting fabric the better your digital cutter results will be. Properly stabilizing the fabric means that your digital cutter will cut the fabric shapes cleanly and you'll experience little to no fraying along the fabric edges. When I am teaching, I like to share with my students, that the fabric should feel almost firm like a piece of copy paper. When you wave the piece of stabilized fabric, you can visibly see and hear that the fabric has body to it and that it doesn't just flop over your hand. Terial Magic, is a brand of fabric stabilizer that really does the job when it comes to stiffening fabric. I highly recommend using it for digitally cutting applications especially for cutting very small pieces of fabric, smaller than the size of your pinky nail. For example, when I do pictorial quilts, I will use it for cutting tiny pieces of fabric for the flecks of light to represent the glimmer in the eyes. But for 95% of what I do, cutting quilting fabric pieces that are approximately 1/2" to 1" in size, save yourself a little money and give Faultless brand Heavy Spray Starch a try. One can is enough to stabilize approximately 1 to 2 medium sized wall sized quilts. If you're not a fan of aerosol spray can applications, or if you need to stabilize several yards of fabric at a time, try Sta-Flo by Purex. This brand of starch comes in a concentrated gallon sized bottle, it's enough to handle large or multiple quilts. It's also inexpensive. Plus, you can dilute it as necessary and pour it into your own spray bottle. And speaking of quilting fabric for digital cutter applications, it's always good advice to work with fabrics that are quality made and that have tightly woven fibers.
#2 - Sharp Blades Yield the Best Cutting Results

Electronic digital cutters use a single blade, seated in a blade holder. The blade holder is typically inserted into a blade carriage. The carriage moves left, right, forward and backward along a programmed path to cut out the fabric shapes. There are all sorts of materials that can be cut using a digital cutter such as Vinyl, Freezer Paper, Chipboard, Felt, Craft Foam, Fabric & Fabric backed with Fusible, Cardstock, Stencil material, Thin Leather, Metal and more. And because we can cut such a wide variety of materials using our digital cutters, there are specific blade types to use depending on the type of material to be cut. The shape and angle of the blade varies depending on the material to be cut. A shallow angle works well for thinner materials while a steeper angled blade works well for thicker materials. But the most crucial tip I can share with you about blades, is to change them when they start to become dull. If you quilt or sew, you already know the importance of changing your sewing machine needles often. The same is true when it comes to digital cutter blades. How often do you need to change the blade? It depends, but examining your cut results is the key. When the fabric shapes aren't cutting out cleanly or if you notice fraying along the cut edges, it could be that you did not properly stabilize or apply the adhesive to your fabric correctly but more than likely a dull blade is probably the culprit and it's time to change it. Here is another tip. If you don't happen to have a new blade on hand right away, you can use that dull blade a tad longer by increasing the cutting pressure and by adjusting the blade depth slightly. But as soon as you can, I recommend that you change that blade! And don't forget to examine the blades themselves, even new ones. Grab a magnifying glass and look for chips along the blade's edge, this doesn't happen often but over the years, I have experienced a chip in one of my cutting blades.
#3 - Caring for Cutting Mats

Cutting Mats are usually a few millimeters thick and made of plastic. Depending on the intended application, the mat can have a light or heavier tack to its surface. They come in multiple sizes, 12" x 12" being a common size. And generally, the mat will have some sort of measurements or 1" grid markings. The material you intend to cut, is typically placed directly on the cutting mat. The mat is then inserted into the digital cutting machine either manually or fed into it electronically. Once the appropriate cut properties have been set and the blade holder has been positioned, the design is sent or exported from the software telling the cutter what shapes to cut out of the material. I have been working with digital cutters for long time and feel confident to share a few of my biggest complaints I had when I first started out using the cutting mats and some of my remedies. The mats seemed to wear out too quickly. Meaning the tack had all but disappeared or the mat's surface was too heavily scratched or scored to deeply. Deeper scores in a mat's surface are typically caused by incorrect blade depth settings. But minor scratches to the surface are expected. Initially, it seemed that I was replacing my worn out mats on a regular basis and baring the expense of purchasing new ones. I did a lot of research in this area. Especially on the topics of caring for mats and on how to re-tack a mat's surface. Through my own experiences, I can now share you a few good tips to prolong the life of your cutting mats. Assuming that you are using your cutting mat for regular use and by following my cutting mat care guidelines below, you could extend the life of your cutting mat from a few weeks up to year or even longer!
Keep your mats clean:

Clean your mats after you are done using them for the day. Using a plastic pan scrapper, an old credit card, a room key, or a metal scrapper specifically designed for cutting mats, regularly scrape away any loose threads or tiny fabric materials that may be stuck to the mat surface. I find that an ordinary razor blade works fantastic for scrapping away these unwanted materials but take care not to injure yourself or to gouge into the mat surface too deeply. Scores that are made too deep will cause issues with your cut results and will render the mat unusable.
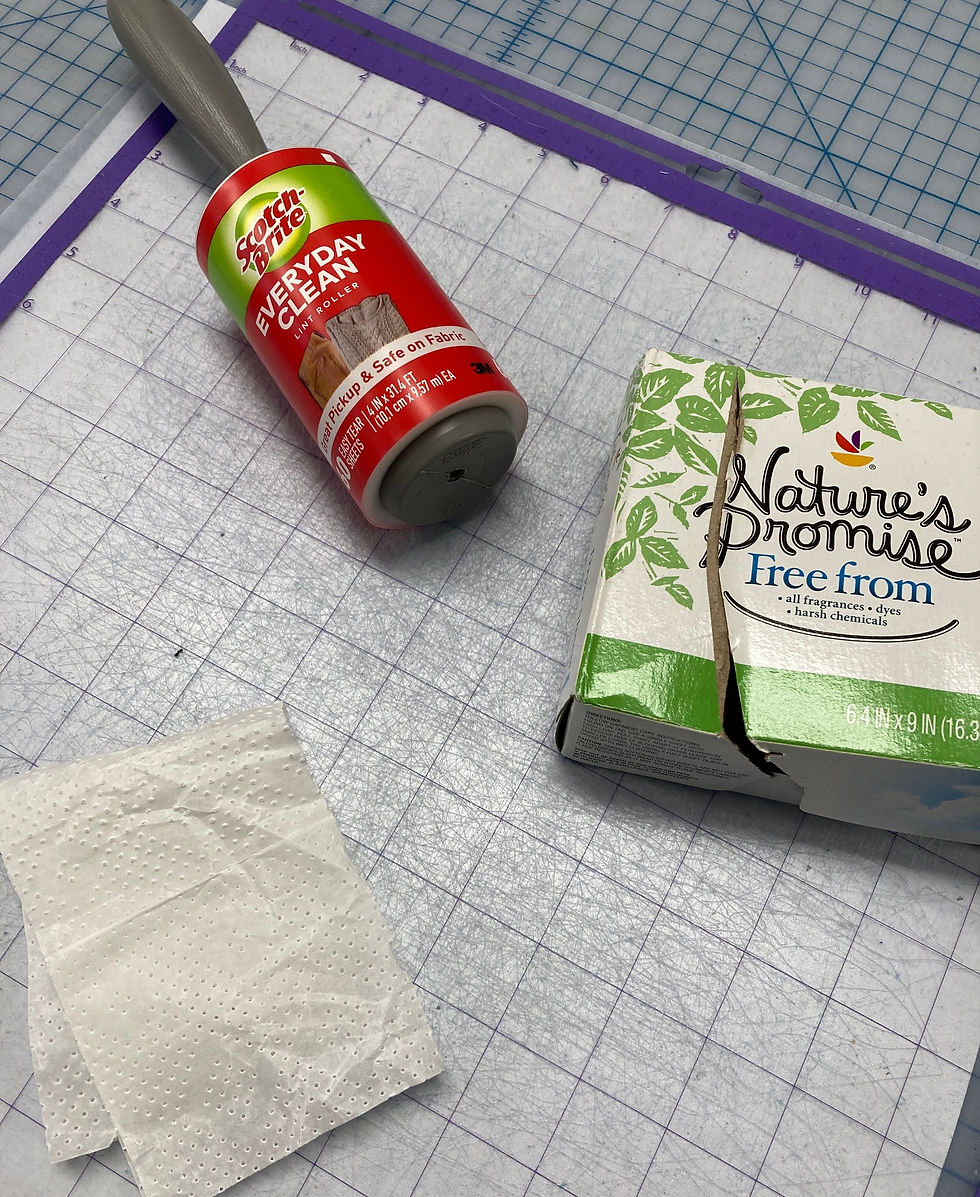
For light cleaning in between cutting sessions, lay your mat on a flat surface and use either a sticky lint roller or rub a fragrance free dryer sheet across the mat's surface to pick up any loose threads or bits of unwanted material. For heavier debris, use any one of the scrappers mentioned above.

When your mat is looking pretty dirty, meaning you are finding dyes from the fabric transferred to the adhesive surface or that extra fabric adhesive is stuck to the mat's surface, it's probably time for a deep mat cleaning. Bring your cutting mat to a countertop or to a flat, clean surface that you can wash on. Use some Dawn dishwashing detergent, a light duty nylon scrub brush and some lukewarm water. Using circular motions, gently scrub the mat. Next, rinse the mat in the sink but take care not to bend the mat as to curl or distort it.

Sometimes it's helpful to use the plastic scrapper to remove stubborn adhesive materials when the surface of the mat is soapy.

Once your mat has been cleaned, wipe it very lightly with a lint free towel and then let it air dry the remainder of the way on a flat, clean surface.

When your mat's surface is completely dry, you may find that some of it's tack has been restored but more likely it has probably lost most of it's original factory tack. The tack is important because it holds the material securely to the mat's surface and it keeps the material from shifting or sliding during cutting. If you need to re-tack your mat's surface, try using a temporary, repositionable adhesive spray. I mostly use this brand, Artistic Tack Temporary Adhesive by Janome but Krylon Easy-Tack and Spray and Bond for Stencils also works well. Remember, the spray adhesive is temporary so from this point on, anytime your mat seems to have lost its tack, you will need to re-apply the adhesive spray. When you are spraying your mat, do it in a large cardboard box or on top of a protected surface. Very lightly spray the mat's surface, in a back and forth sweeping motion. Try not to spray the very outer edges of the mat's surface because the edges are where you handle the mat from.
#4 - Mat Storage
To keep a mat from warping or to prevent the edges of the mat from curling, which can cause some real problems during the operation of the cutter, especially when the mat is feeding in and out of the cutting machine, always store your mats flat when they are not in use. And to keep dust or debris off your mats, cover them with the protective coverings that came with the mats. If you happen to lose or accidently throw away the protective covering, use a piece of freezer paper. Cut it to the full dimensions of your mat and place the freezer paper with the shiny side down covering the tacky side of the mat.
#5 - Removing Pesky Starch Flakes

Even if you have properly prepared your fabric with starch, you may experience starch flakes or residue on your fabric. It's the nature of the beast. I've tried many different types of fabric stabilizers as well as different brands of starch. I have also experimented with the amount of starch to use (light, medium and heavy) for digital cutter applications. Heavy starch as a fabric stabilizer yields the best fabric cutting results when using a digital cutting machine. So, here's my excellent tips for preventing and removing minor starch residue or starch flakes from your fabric. If you notice flakes during the time of pressing, it may be that you over saturated the fabric, your iron's settings may be too hot or that you need to let your starch have time to penetrate the fabric. But if you don't catch these pesky flakes until the material has been prepared with adhesive and is now positioned on your cutting mat. Try using a Scotch-Brite sponge or pad, gently rub the green side that has the rougher surface back and forth over the starch flakes, lightly brush away the flakes. Spritzing the fabric with water is a No, No! It dilutes the applied starch in that area of the fabric and causes disasters when the cutter cuts the fabric shapes in those diluted areas. You also shouldn't apply any water once the fabric adhesive has been applied. In both instances, you will experience poorly cut fabric pieces or issues during the machine's cutting process.
Did you happen to catch this post made by Create Whimsy on some of the best fabric storage ideas? https://createwhimsy.com/projects/10-best-fabric-storage-ideas/ It's a good share. Whether I'm thinking about fabric storage or organization, I like to take all that motivation that I feel at the start of a fresh new year to take control of and organize my sewing space. As quilters, we have fabric stashes that just may need some organizing. Read a few these great ideas from various quilters and fiber artists and see if any suggestions might workout for you. And while were on the subject of organization, stay tuned later this month for my next Janome Maker sewing project, it will feature a Memento/Memo Board you can make yourself and use to neatly display and keep track of sweet mementos, photos, cards, messages, to do lists and any other small items. Here's a sneak peek...

I am happy to share that I am out and about teaching and lecturing in 2023! If you want to learn more about Mosaic Quilt Making or Decorative Stitch Art please join me in one of my upcoming classes. You can find my schedule on my website here. But, if you are in need of an immediate quilt or sewing get away and play mini vacation...I am just one of the many fantastic teachers sharing some really fun and informative classes at the upcoming Mid-Atlantic Quilt Festival in Hampton, VA, February 23-26. There's still some available spots left in my classes! To learn more or to register visit: www.quiltfest.com

Thanks for sharing the love of quilting and sewing with me!


Comments