Summer of Bojagi Patchwork, Bojagi Pumpkin Window Hanging, Happenings in and out of the Studio
- Heidi Proffetty
- Oct 29, 2021
- 10 min read
Have you ever been on a tear with something? And what exactly does this phrase mean? To begin with, it's a slang phrase meaning to have a sudden burst of energy, on a streak or a winning series. I get on tears with things sometimes. For example, when I get the sudden urge to organize my closets or when I decide to try my version of a new recipe. Often, these kinds of tears can be personally rewarding. My closets get organized or the new concoction I tried was a hit with the family. However, when I'm on a tear in my studio it can be especially rewarding and can lead to all sorts of beautiful creations like this patchwork piece I made this summer.

It's a natural process for artists and creatives to experience ebbs and flows in their creativity. No one can be on their A-game 100% of the time. And, when an ebb happens, it can feel frustrating to be zapped or emptied of inspiration. And, when a flow happens, it can feel exciting and sail you right to the moon. But there is another force that may also sometimes influence our ebbs and flows, I refer to it as an ignitor. An ignitor is defined as a device for lighting or fueling a fire. And in our creative world, I think of an ignitor as a sentiment or person(s) responsible for jump starting our passion.
For a little over 3 1/2 years, I have been part of the Janome Sewing Machine family. I am a Janome Maker, a project contributor. And I think of this relationship from both an inspirational and family oriented view. Yes, being a Janome Maker means that I am the recipient of some perks, such as sewing on newer models of Janome sewing machines, occasional shout outs on social media or involvement in special promotional projects. But while these perks can be nice and promoting good products makes perfect sense, I strongly believe that there is really more to any relationship than to get things or to receive accolades.
Over the winter, I had been working on decorative stitch art designs. As my collection of designs grew, I felt that they needed a permanent home, but I still hadn't figured out what kind of home? The ignitor, was my friend and colleague at Janome, she is an educator, creator and an inspirer who probably very unassumingly, but metamorphically speaking, lit the newspaper under the kindling. It began a search for me that later evolved into something much more.
In early January, I was given the opportunity by Janome America to make three "wow" projects incorporating my technique of Decorative Stitch Art for Janome's Education Dealer Convention to be held later in the year. Unfortunately, this convention was postponed in late August but fortunately that did not extinguish the small fire that my friend had started.
Decorative Stitch Art is stitched designs, created to embellish fabric using the standard and decorative stitches found on any brand of sewing machine. The density of the stitches is light to medium and the designs are a little more organic which is different from the perfectly stitched digitized designs you'd purchase to use with an embroidery machine. It's not free motion stitching either, because you are not free stitching a design. Instead, you are using your imagination to combine programmed stitches on your sewing machine to help you build a final stitched design that can be use for all sorts of embellishment purposes. The technique is especially useful for anyone that does not own an embroidery machine.

A mid-level sewing machine is ideal to use when creating decorative stitch art. Meaning, a machine that's not too basic but it doesn't have to be a top end machine either. Rather, a middle of the road sewing machine works fine. To create designs, the sewing machine should offer you a decent amount of decorative stitches and perhaps some enhanced stitch functions such as elongated, mirroring or combination stitches. My designs are created using the Janome Continental M7 sewing machine. Decorative stitch art works nice as an embellishment for all of the usual embroidery type items, towels, pillows, and clothing, etc.
Embellishing home décor items and garments is certainly ideal when we want to use our stitched designs for these purposes. However, I was thinking a little broader, I wanted to find a permanent foundation, a fabric base that I could add my stitched designs to, that as a whole, would become a finished piece of art.
In my searches, I found an answer. I stumbled upon the traditional art of Korean Bojagi Patchwork. At first sight, I was drawn to its delicacy. Later, I was pulled deeper into bojagi's rich history, the patchwork style, the clean seam construction and the translucent beauty of the finished piece. The translucencies of bojagi reminded me of one reason why I appreciate mosaic quilting as well as glass mosaics too. The quality of light reflecting or seemingly passing through the mosaic pieces excites me.

In my searches, I bought these two insightful Bojagi reference books: Bojagi by Sara Cook and Korean Patchwork Quilting by Choi Yangsook, I also purchased this terrific bojagi sewing machine pattern: Gradient Panel - stained glass patchwork window hanging digital pattern by Elizabeth DeCroos of Epida Studio & Designs. I watched online videos and read any blogs that I could find to educate myself about this art form and about its techniques. I took some time off from making mosaic quilts and practiced the making sewing machine bojagi. The time was well spent because it lead me to some visions I had for making my own style of patchwork pieces.

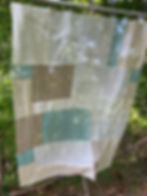
Bojagi patchwork is sometimes constructed as a single layer of small blocks of fabric often made from remnants of old clothes or leftover scrap fabrics. The types of fabric used can be rami, hemp, silk and linen. The construction method is often a hand sewn technique where the stitching is emphasized. But as textile artist, Elizabeth DeCroos and others demonstrate, the technique can also be done using a sewing machine. The final patchwork is fluid, light and airy. And it is utterly memorizing to watch blowing in a gentle breeze. The patchwork is used for both aesthetic and utilitarian purposes such as window treatments, artistic room dividers, sentimental gift wrappings, food coverings plus other applications.
The magic of bojagi lies in its seam construction. It basically uses flat felled seam technique, a type of hidden seam used in garment construction. The are no visible raw edges, the seams are fully encased. If you were to examine a single layered bojagi patchwork in person, the seams are neatly enclosed both on the front and back sides of the patchwork. And when a finished bojagi is held up to a light source, the folded seams take on a darkened appearance and magically outline the sheer blocks.


When I first started making bojagi, I worked with large fabric blocks, sewing the blocks together as units, mainly to practice the seam technique. Once I had the seam technique figured out, I then stitched the larger block units together to make one large piece of patchwork. Similar to a traditional quilt top. Later, I varied the dimensions of blocks, both large and small but continued to make larger sized patchwork pieces. Apart from figuring out dimensions, fabric selection was probably the most time consuming part of the process for me. I experimented with a variety of traditional Korean bojagi fabrics and with other fabric types. It was artistically important that I find the ideal sheer fabric to work with so I paid particular attention to the weight and type of weave. I also considered the hand of the fabric, the type of fibers, dye qualities, accessibility and cost. Eventually, I settled on a very lightweight linen blend.
While I was making fabric decisions, I also dabbled with hand dying my own fabric. Something I swore that I would never do. Buckets, gloves, liquid and powder dyes, soda ash, salt... Never say never! I learned quite a bit on various types of dyes, fabric dying processes and how dyes work with natural verses synthetic fibers. I also became familiar with what kind of dye results to anticipate with different linen fiber blends. These were all very new techniques that I was playing with and there was a lot to learn (and admittedly, I am still learning).

What surprised me the most, was the unanticipated joy I found with the dye results. Firstly, I don't dye fabric for mosaic quilt making. Instead, I purchase commercial and hand dyed fabrics. Secondly, it was summertime which was very convenient because I could take my freshly hand dyed linens outside to dry in the warm weather. Here my wet fabrics are laid out all over my deck furniture. Eventually, I purchased some standard drying racks which worked out much better. As I pressed and cut each of my new vividly colored linens, I felt this extra sense of pride and later on that pride grew into a deeper connection with my patchwork creations.


Once I decided on scale, fabric and a dye process, I moved onto the design phase. The elements that make these patchwork pieces mine. I started by designing patchwork layouts on graph paper and then switched to designing on my computer. I also sketched lots of possible stitch art designs and did small scale tests to practice stitching my designs on the linen. At any point along this creative tear, I understood that there was a possibility that something or things could have gone wrong or yielded poor results. And, I also knew that too much frustration throughout the journey could have lead to abandoning the entire process all together. And honestly, that would have been okay too. But this time, that wasn't the case, instead things continued to move along with positive momentum and enthusiasm.


I did experience some nuisances or challenges along the way. Such as figuring out what type of fabric stabilizers to use to support the stitches on a very lightweight, unstable linen weave. And also a few mishaps in the dying process where my brightly dyed fabrics bled into my neutral colored fabrics. But I was expecting some learning curves.

The point being, is that I did face a few challenges but not enough of them to derail me. I worked through each step and dealt with issues as they arose. Experimenting in this manner, also offered other types of rewards as mentioned earlier. I found the beginning of perhaps another one of my artistic paths and I felt enthusiastic throughout the process both of which drove me right to the finish line. In my opinion, the final results were that good, the type of good that you wouldn't let it slip away like the end of summer often does.
I want to extend my personal admiration to the Korean history behind this thoughtful and beautiful art form and to all of the makers and artists that created, continue to create and teach how to make these stunning pieces of textile art.
Here are some of my bojagi patchwork quilt designs completed over the early spring and summer months.


These are a few close up images of the decorative stitch art designs created to enhance each patchwork.


As I learned about bogaji, I grew an even deeper appreciation for it. I made this is the special tassel or Korean Norigea, a symbol of good fortune to adorn my Hera tool, a common bojagi tool used to mark creases for fold lines in the fabric.

And since it is almost impossible to put a traditional style quilt label on this type of sheer patchwork without distracting the overall design, I created these unique quilt labels. My adapted form of Norigea and quilt label in one. On the backside of these decorative stitched labels are the written details about the patchwork design. I think the labels add a personal final touch.

I had a very positive experience creating bojagi patchwork and since I am a frequent project contributor for Janome Sewing Machines, I thought would be fun to create and share a smaller bojagi pattern with my friends and supporters. And because it's the fall here in New England, I was feeling the seasonal pumpkin vibe. Here's my original step-by-step pattern to make your own, Bojagi Pumpkin Window Hanging, embellished with Decorative Stitch Art. I hope you give it a try and that you find some pleasure in making it.


Recently, in my studio, I've been working on a new Moroccan mosaic quilt design pictured here...it has sort of a kaleidoscope appearance and it features a very neutral but contrasting color pallet. It incorporates some applique and has open space for enhanced quilting.

Building this design has been moving along at a little slower pace than usual. The reason is because I have incorporated a few newer elements into the design which I will explain further on. These added elements require learning a few new techniques and the techniques require time for testing. As a rule, I spend valuable time testing any new product or process to make sure of its reliability and to ensure that it produces consistent and favorable results time and time again.
Making this new quilt uses the same process that I have always used in mosaic quilting. I first draw the design on paper or in a graphic arts program using my computer or iPad. Then I manually trace my entire design to create the cleanest cut file. A cut file, is a file that is recognized by digital cutting machines. Next, I use a digital cutter to cut all of the small and intricate fabric pieces of my entire design. I build a design, much like you would if you were building a jigsaw puzzle but instead puzzle pieces, I use fabric pieces. I finish my quilt by doing free motion stitching to the entire design.
One of the new design elements I added are smaller, separately built mosaic units which would then be added to the larger quilt design. For example the petals, corner triangles, arcs/curves and circle shapes seen in the above complete design. These smaller units use a different colored base fabric, a black or dark fabric, which I designed to contrast against the white base fabric in the overall design.


The other is new process, for me at least, is applique. Which is new to appear in my mosaic quilt designs. Each of the smaller mosaic units and arcs/curves are turned edge or applique. Typically, my quilts are built using all small (under 2") raw edge fabric pieces. And since the these separate mosaic units ranged in size anywhere from 6" to 12", I figured the most polished method to handle the larger raw edge pieces and to prevent fraying was to prepare them as applique.

For these large applique pieces, I used a new and extremely helpful product made specifically for prepared edge applique, Karen Kay Buckley's Perfect Heat Resistant Template Plastic. These are heat resistant template sheets, easy to write on, easy to cut and they are ironable using a dry, medium heat setting. No pun intended...they are perfect to use for applique. If you are looking for a method of preparing nice looking, uniform prepared edge applique pieces give this product a try. Link to the product here and Karen Kay Buckley's video tutorial here.

If you wish to follow along, I will be sharing more about of the progress on this new quilt design on my social media pages, Facebook and Instagram, under my name Heidi Proffetty.
Out of the studio... let's me share about something that can make you burst at the seams with excitement and about some very proud parents. Our oldest daughter, Erin, just recently graduated from basic military training at the Lackland Airforce base in San Antonio, Texas. Anyone who understands the military, understands the discipline, commitment and work ethic involved. And most everyone can appreciate the pride. Just look at the joy on our daughter's face as we approach to officially tap her out at the graduation ceremony. It was one of these memories we will never forget.

And here she is again, with her beautiful smile, Airman Proffetty! Erin is currently attending tech school at Keesler Airforce base in Biloxi, Mississippi. To sum it up in just a few short words...you go girl! We couldn't be prouder of you!

Happy Quilting, Sewing and Creating!
Heidi